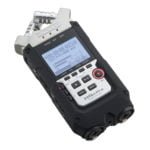
Transcription Turnaround Time
Transcription turnaround time depends on several factors –
Duration of the audio or video recording
A clear 60-minute recording can take anywhere between 2-4 hours to transcribe and another 1-2 hours to proof. First the transcriptionist types out the entire recording without rewinding any part. Then she proofs the transcript by listening to the entire recording once again and simultaneously reading the text. While doing this she corrects errors and fills in the blanks left out in the first round. If there are too many blanks or mistakes in the text, a second round of proofreading may be needed, consequently increasing the transcription turnaround time.
Number of speakers
Speaker identification in recordings with multiple speakers can take time (depending on the rate of speech of the speakers and how disciplined the conversation is).
The transcriptionist has to carefully identify of each speaker’s voice and mark their name correctly each time they speak on a recording. For this the transcriptionist has to go slow and may have to re-listen to parts of the recording more than once.
Accents
Transcribing recordings in strong accents – such Irish or Australian – not only requires an understanding of the accents but also colloquialisms. A transcriptionist must have experience in working with difficult accents and has to carefully listen/re-listen to the recording to ensure accuracy.
Accents almost invariably add to the turnaround time for transcription.
Technical Content
Transcribing interviews, seminars, and other recordings on technical subjects requires research. A medical interview may involve medical terminology or a board meeting may involve financial terms that are not commonly known and must be researched.
Generally a transcriptionist would mark these terms as blanks while creating the first draft. Then he’ll go back and research each term to fill in the blanks at the time of proofreading. This obviously adds to the transcription turnaround time.
Audio Quality
This is a big one. A clear recording, free of background noise and recording issues is the easiest to transcribe. But many audio files (especially those created outdoors or created using inadequate equipment) are not well recorded. For example, an interview conducted over dinner without using lavaliere microphones may have the sound of cutlery, background music and side conversations recorded along with the actual voices of the participants. This makes transcription difficult and naturally slows down the process.
Transcription turnaround time is also impacted if the volume of the speakers is not high enough. It is always advisable to use microphones and (when possible) conduct the recording in a quiet room to minimize noise.
Transcription Style
There are 2 main styles of transcription used by most people. Verbatim Transcription and Clean Read Transcription. Verbatim transcription normally takes longer.
Editing
Editing a transcript for grammar, punctuation, sentence structure, etc. requires an editor to go through the entire text. This adds to the time taken to produce a finished product.
Formatting
Adding formatting such as headings, subheadings, italicizing or highlighting text, paragraphing, adding margins, etc. also adds to the transcription turnaround time.
In essence, transcription turnaround time depends on the recording quality, complexity of the subject, and what you need the final document to look like. The best way to find out how long your recording will take is to send a sample to your transcriptionist and ask them to give you an estimate.
How To Choose A Digital Voice Recorder
If you’re a student or business person who needs to record and
processaudio files often, you probably know how important it is to choose the right recording device.
Digital Voice Recorders (DVRs) are a great way to create high quality audio files that can easily be transferred to a computer later for editing, customization.
There are a huge number of choices available in the DVR market. So knowing what to look for is important. Here are some basic features to consider when shopping for one:
Sound Quality
Most DVRs come with multiple sound quality settings, for e.g. LP (Long Play – lowest quality), SP (Standard Play – medium quality), and HQ (High Quality – highest quality). Higher levels of quality require more memory and consequently reduce recording time.
If you’re recording the audio for your own listening then even the lowest level of recording may be sufficient (may be). However, if you plan to use the recording to create products (like podcasts or CDs) it would be wise to choose the highest level of recording and supplement recording time with additional storage devices like flash drives and removable memory cards.
Microphones
Built-in microphones in most DVRs make them completely self-contained recording units. On the flip side though, they capture all sounds indiscriminately – including the sound made by the recorder itself – so they’re great for single-speaker audio recorded in a quiet room but not so effective if there’s any amount of noise around or if there are multiple speakers involved. They also limit one’s options in terms of positioning the microphone according to the kind of audio being recorded (for e.g. if you’re interviewing someone, you’d have to keep moving the recorder between the two speakers – and every time you do that, the noise from the movement will be recorded).
Choosing a DVR with an external microphone jack is by far the best option. You can then attach a lavalier, unidirectional, or omnidirectional microphone to the device according to the type of audio you plan to record.
Telephone Adapter
Some DVRs come with a telephone adapter that can be used to record telephonic interviews, teleclasses, etc. External phone adapters are also available.
PC Connectivity
If you want to work on your audio files using a computer (for creating information products, editing content, etc.), your DVR must have a USB port and connectivity cable that will allow you to transfer audio files from the recorder to your computer.
File Formats
If you plan to share your audio files with others, it’s important to save them in a format that can be easily played. The four most common file formats are DSS (Digital Speech Standard), WMA (Windows Media Audio), WAV (Waveform), and MP3 (MPEG-1 Audio Layer 3). DSS files require additional software to play on PCs, WMA files are compressed files that can be played on the Windows Media Player, WAV files are high-quality, uncompressed files that are very large, and MP3 files are compressed files that are much smaller than WAV but almost the same quality.
Some recorders create files in proprietary formats that can only be played on the device or using its companion software. If you choose one of those, it’s advisable to either convert the files to one of the common formats before sharing them with others OR send the companion software along with the file.
Recording Time
This varies from product to product. Recorders can store anything from 90 minutes to 20 hours of recording. External storage devices such as flash drives and memory cards are also available.
Recording time is directly related to the level of quality chosen. High quality audio takes up more space and reduces recording time. With a low quality setting your device can record more. You should choose a device that is suited to the kind of audio you want to record.
Battery life
The battery life of a DVR can be anything between 25 hours to 32 hours (this can however vary depending on how old the batteries are, when they were last used, etc.). It’s advisable to choose a device with both battery and electrical adapter capacities.
There are many other features of DVRs that can be considered at the time of purchase, but these are the main things to look for.
And for the visual learners amongst you, here’s a great video guide to portable digital voice recorders from B&H – http://www.youtube.com/watch?v=8Ey_ySC9aO0
Happy recording!
What is verbatim transcription?
Simply put, verbatim transcription is the transcription of every word and sound on the recording along with non-verbal communication such as laughter, pauses, etc. For example:
Interviewer: Did you ever correspond with him at the time?
Interviewee: [Silence] No… er… I don’t recall that. I think.. um… I think I have some letters from him in my file though…which came some months…years later.
In the verbatim style of transcription text is NOT edited to remove fillers (ums, ahs, ers, etc.), false starts (incomplete sentences), repeated words/sentences, and even grammatical errors. Everything is typed just as it’s there on the recording.
The style can also be customized to specific needs of a project. For example, a project might require noting any pauses that are 5 seconds or more and the shorter ones, or it might be desirable to have the main interviewee’s words transcribed verbatim but not necessary to give the same amount of detail for the speech of additional participants.
Verbatim transcription is ideal for research transcription, PhD interviews, market research interviews, movie scripts, B-roll transcription, and other projects where HOW something is said is equally important as WHAT’s being said. However, if you’re looking for a clean, easy-to-read document Clean Read transcription may be a better choice.
The style requires a keen ear, attention to detail, and a LOT more time than other styles of transcription. Consequently the charges for this style of transcription are normally higher than others.
12 Things to Consider When Outsourcing Transcription Work
When setting out to outsource the transcription of a recording, the main idea in most people’s minds is to get a printed version of the audio/video recording. But it may be a good idea to give the whole exercise a little more thought if you want a document that a) you can use, and b) doesn’t cost you a bomb.
Here are some points to consider:
1. How accurate do you want the transcripts to be?
If you’ve heard the recording (or intend to do) and need a transcript only for your personal use, then you may not require a very high level of accuracy (around 85-90% should be enough). Less accurate transcripts require fewer rounds of proofing and therefore cost less. This should be mentioned at the time of hiring a transcriptionist and discussing transcription rates.
If you don’t intend to hear the recording OR the transcript is going to be shared with others (especially customers) then you would do well to choose a higher level of accuracy (98-99%). Again, this should be discussed with the transcriptionist or transcription company because a higher level of accuracy requires more time and consequently costs more.
2. Transcription styles
There are mainly 2 styles of transcription used – Verbatim & Clean Read.
Verbatim transcription involves typing out every word and sound on the recording along with non-verbal communication such as laughter, pauses, etc. This style is ideal for research and analysis but if you’re simply looking for the main ideas on the recording, a transcript based on this style may be cumbersome to read.
Clean read transcription makes for easier reading. It involves typing every word but removing irrelevant content such as fillers, false starts, side conversations, etc.
Verbatim transcription takes longer and therefore costs more. As such, the transcription style should be discussed with the transcriber at the beginning of a project.
3. Does your recording involve technical terminology?
If yes, then you would need to decide if you want your transcriptionist to research these terms at the time of transcription. If you prefer to fill in this information yourself, you can instruct the transcriptionist to leave time-stamped blanks at the places where these terms appear in the recording (the time stamps will help you quickly skip to the relevant part of the audio at the time of proofing).
Research adds substantial cost to transcription and this should be considered when outsourcing transcription work.
4. Does your recording involve heavy accents?
If yes, then it would be wise to choose a transcriptionist who is familiar with the accents involved. For example, not everyone can transcribe an Australian or Irish accent unless they have a trained ear for these!
Check with your transcription company if they have experienced transcriptionists to handle different accents.
5. Turnaround time
A single hour of clear recording takes 3-4 hours to transcribe and 1-2 hours to proof. This will go up if the recording involves accents, background noise, multiple speakers, etc. The standard turnaround time of most transcriptionists and transcription companies is 3-5 days. If you need the transcript sooner than that, you may have to pay ‘rush’ charges. It would be a good idea to discuss this beforehand.
6. Is the recording clear?
If your recording has background noise, recording issues, or people talking over each other, then the transcriptionist will have a tough time deciphering what’s being said. Such audio normally requires several rounds of proofing to reach a decent level of accuracy and consequently takes longer to transcribe. The costs involved are also higher. If you have such a recording, it may be a good idea to send a sample file to your transcriber so that they can give you an accurate evaluation and quote. You can even ask for a paid sample to see if you’d be getting your money’s worth.
7. Number of speakers
If you’re not particular about speaker identification (i.e. marking each speaker’s name separately and correctly) then you need not worry about this point. However, if you do need speaker identification, then it’s a good idea to check with your transcriber if they can do it for you. Usually 2-3 speakers are not a problem, but when the numbers go beyond that, the transcriber has to carefully listen to each voice in order to mark speaker names accurately. Not everyone can do this well and therefore it’s a good idea to choose an experienced transcriber or transcription company for such audio.
8. Formatting
This is an important one if you don’t want to land up with a long document without any paragraphs or page breaks! Let your transcriptionist know that you would need the text broken into short, easy-to-read paragraphs with page breaks at appropriate places. You can also ask for additional formatting such as headings, subheadings, special margins, italicizing of text, etc. This may involves additional time and cost, but is worth it in the long run.
9. Editing
Many transcription companies provide editing services that can be used for creating a ready-to-use documents. Editing services may include checking the transcripts for grammar, punctuation, sentence structure, fillers, false starts, slangs, etc. You can also ask for the text to be placed under contextual headings/sections or have the transcript converted into an information product such as an e-book, blog post, workbook, handout, PowerPoint presentation, etc.
10. Transcription of videos
Most transcription companies convert video files to audio format before beginning transcription. This, however, may not be possible with certain video formats or with streaming videos. In such cases, the recordings cannot be loaded in to transcription software and has to be transcribed directly from the video recording. This takes longer and costs more. Checking on the additional costs involved for transcribing videos may be a good idea.
11. Sending files
How are you going to send files to the transcription company? Do they provide online space where the recording can be uploaded? Can you email the file to them (i.e. if the file is not too big to be emailed)? How will the transcript be delivered? Can you use FTP or send a link to the recording?
Many transcription companies provide free online space for uploading files. If they don’t, you can use the services of online file transfer services such as yousendit.com, sendthisfile.com, etc.
12. Payment methods
Depending on the location of the transcriptionist/transcription company, there are several payment options to choose from, such as PayPal, Moneybookers, Payoneer, and Xoom. Wire transfers, moneygrams, and checks are also some options available. Checking for a mutually convenient method of payment may save a lot of inconvenience later.
Outsourcing your transcription work can lead to substantial savings both in terms of time and cost. But an uninformed decision can lead to the opposite! For best results, invest a little time on research and choose the right service provider. Good luck!
